Network Utilities
ifconfig
Now that your kernel can talk to your network hardware, what's needed is a way for software to tell the kernel to pass some information along, and vice versa. We need to configure an interface. We need ifconfig(8).
ifconfig is probably best learned by example; you may want to just take a look at your rc.inet1 file (covered in the section called rc.inet1) to see how it's done there. The simplest and most common case looks something like this:
# ifconfig eth0 192.168.1.10 broadcast 192.168.1.255 \ netmask 255.255.255.0 |
This line brings up eth0 (the first ethernet interface; for token ring use tr0, ppp use ppp0, etc.) with an IP of 192.168.1.10, a broadcast address of 192.168.1.255 (the entire 192.168.1 subnet) and a netmask of 255.255.255.0 (indicating that all of the first three parts of the “dotted quad” of the IP address refer to the network, while all of the last part, .10, refers to the host). Unless you're doing something funky, you can almost always use a broadcast address that's the first three parts of your IP followed by 255. You can also almost always use a netmask of 255.255.255.0. If you are doing something funky, you probably know enough that this part of the book isn't going to be of much use to you.
ifconfig can also be used just to see what's there. Run it without any options or parameters to get a listing of all of your current network interfaces and their settings.
route
In order to know where to send which data, the kernel maintains a routing table. I'm not going to go into much detail about it here, but you can view the routing table by running /sbin/route(8). route -n will give you the table with IP addresses instead of names; this is useful if you're having trouble talking to your name server or if you're just not interested in the illusory world of domain names. Fortunately, if you have a simple network setup (and most people do), the 2.2 kernels will automatically create the necessary routing table entries for you.
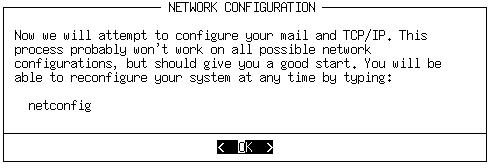
netconfig
netconfig is part of the Slackware setup program, but like most of setup's components it can be run on its own. netconfig is very straightforward, and will walk you through setting up a basic network connection. It's an especially good program to use if you're not very familiar or comfortable with the network rc files. When you run netconfig, you'll be greeted with this screen:
Next, you'll be prompted to enter the hostname and domain name of your computer. You can probably just make something up for both of these, unless you are setting up a server or other machine that lots of people will use. Then, you will be asked if you will be using a static IP, DHCP, or just loopback.
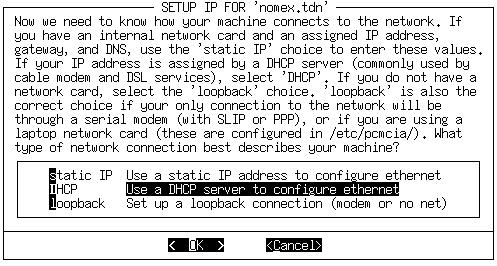
If you are not going to be connected to a network, choose loopback. If you are setting up a computer that will be attached to a university or large office network, you should most likely choose DHCP. Otherwise, choose static IP. Unless you chose static IP, you are now done. If you did choose static IP, you will now have to enter your computer's IP address, network mask, broadcast address, and name server address. netconfig will tell you how to figure out all of those numbers.
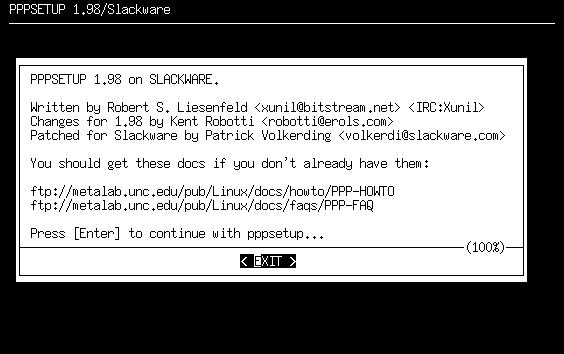
pppsetup
Slackware includes the pppsetup utility for configuring a dialup connection to an ISP. It is located in the ppp.tgz package in the N software series. pppsetup uses the same interface as the setup program. If you don't remember how to use this interface, refer back to the section called The setup Program in Chapter 3 for some instructions. pppsetup asks you a series of questions and sets up several configuration files in /etc/ppp for you. As root, run pppsetup; we'll walk through the questions here.
- Phone number
The first question prompts for the phone number of your ISP, prefixed by the type of dialing. For most people, you will want to use tone dialing. If your ISP's phone number was 555-1013 and you used tone dialing, you would enter atdt5551013 into the dialog box.
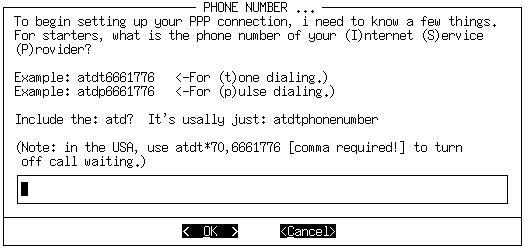
If you have call waiting on your phone line and want it disabled for when you connect (probably a good idea), make sure to enter something like this into the dialog box: atdt*70,5551013
The comma is required. It puts a 1.5 second pause between the *70 to disable call waiting and the ISP's phone number. It won't work without the comma.
- Modem device
Next, select the location of your modem. If you know what COM device it was under Windows, you can select the listed equivalent. Otherwise, you might have to do some experimenting. The best course is to start at ttyS0 and work your way down the list.

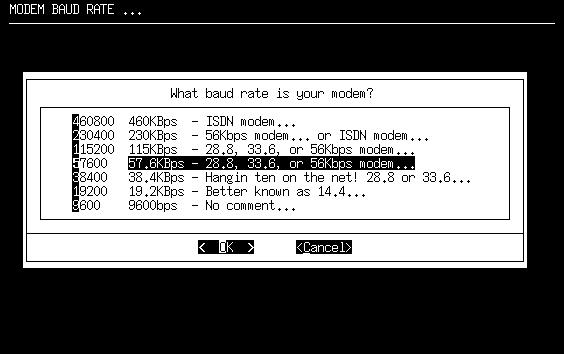
- Modem baud rate
Next, pick the baud rate that's closest to your modem's. If you don't know the baud rate, you could check the modem's box or any documentation that came with it. Each selection has several examples, so it shouldn't be hard to figure out.
- Callback
Now, you'll need to start referring to any information that your ISP gave you. Few ISPs use callback, so you can probably safely select “NO”. Callback is where you dial up the ISP and they then call you back so you can log in.

If you have to use callback, select “YES”. Then, you'll be prompted to enter your phone number, a login name, and a password. You may not have to enter an initial login name and password. Finally, you'll be asked what kind of authentication scheme your ISP uses. If they use CHAP or PAP, select “YES”. Later on, you'll need to set this up. Refer to the section below. If they don't use either of those, select “NO” and refer to the “Chat script” section below.
- Modem init string
Unless you have a strange modem, you can probably just hit enter to select the default init string (“AT&FH0”). Otherwise, refer to any documentation that came with your modem as to what to use for the init string.

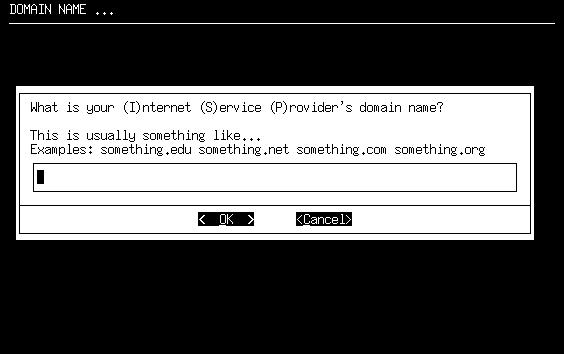
- Domain name
Now, you'll need to enter the domain name of your ISP. This will be something of the form “example.net”, “slackware.com”, or something similar. (Okay, it's most definitely not going to be slackware.com :)
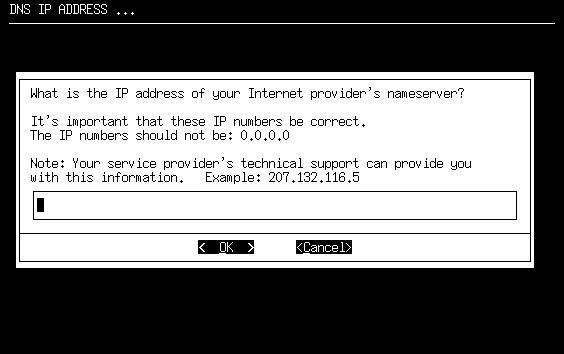
- DNS IP address
Your ISP should have provided you with the IP address of their nameserver. If you've got that IP address, punch it into the box. Otherwise, check in with your ISP to see what number to use.
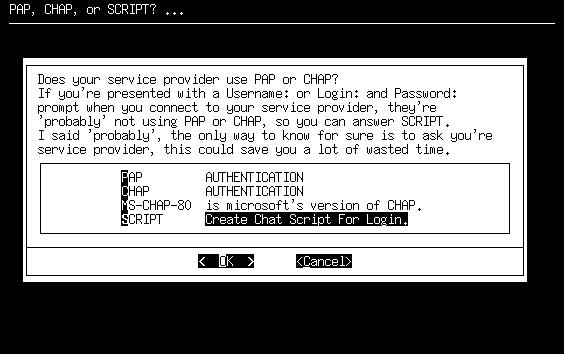
- Authentication method
This question might also take some trial and error work. You need to figure out if your ISP uses CHAP, PAP, or neither for user authentication. The easiest way to figure this out is to call your ISP. However, if you are presented with login and password prompts when you connect, you should most likely choose "SCRIPT". Otherwise, check with your ISP to determine which one to use.
- PAP or CHAP
If you selected “PAP” or “CHAP” on the authentication method screen, you'll be prompted to enter your username. Your ISP should have assigned you a username. If they didn't, there is something terribly wrong. You will need to contact them and get a username.
Then, you should enter the password that your ISP assigned to you in the next dialog box.
- Chat script
If you selected “SCRIPT” on the authentication method screen, you'll be presented with a fairly lengthy discussion of what a chat script is. Make sure to read it because it describes everything very well. Basically, you want to tell it what kind of information your ISP is going to send and what your computer should send back to log in.
You'll then go into a loop of entering some text for what your computer should expect from your ISP, followed by what information it should send back. You can break this loop by hitting enter on an empty box.
- Done
Finally, you'll be shown your complete ppp configuration files. You can't really do anything about them, but you can at least check everything out. Hit enter to save everything and leave pppsetup.
This screen also has a lot of information about how to bring up your dialup connection and how to drop it after you are done. The basic idea is this: as root, run ppp-go to start the connection. Once it gives you a local and remote IP, you are connected and on the internet. When you are done, run ppp-off as root and it will drop the connection.
